How to Make Christmas Wood Slice Ornaments
Making wood slice ornaments is such a fun holiday craft! Not only do they add charm to your tree, but they also make great handmade gifts.
So today, I’m going to show you how to make these cute Christmas, wood-slice ornaments that you can share with your friends and family this holiday season.

Homemade Wood Slice Ornaments
Each year we try to make a new ornament for our tree. It is a fun project to do with the kids and it serves as a nice memory for the year. (Check out our Finger Print Ornaments from last year.)
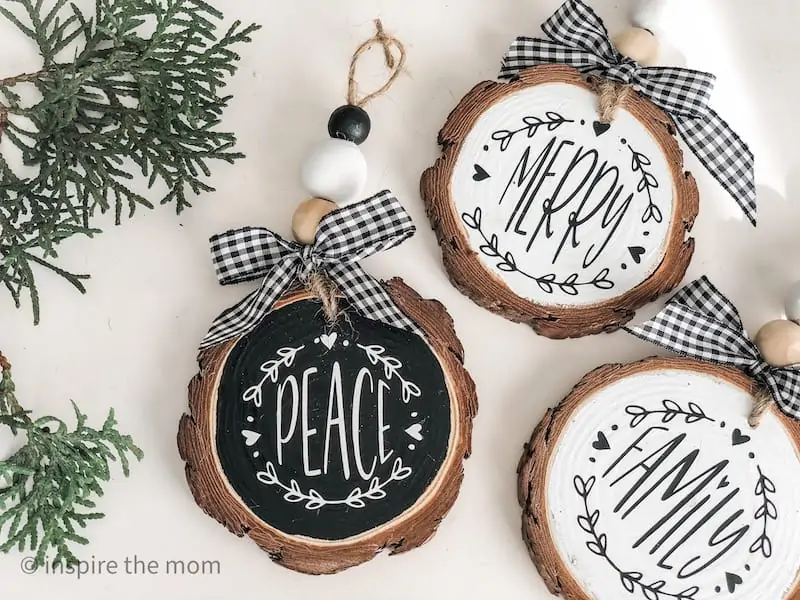
While these were a little more work upfront, our family agrees that they turned out pretty cute.
Before we get into the how-to’s, let me say, this project is a little more advanced in that it requires quite a few materials, as well as, the use of a cutting machine (cricut or silhouette).
If you don’t own a Cricut Machine you could purchase ready-made decals, or paint your own design.
Materials Needed for Wood Slice Ornaments
If you are a crafter at heart, you probably have most of the materials needed for these wood slice ornaments in your arsenal of crafting supplies. If not, you can, more than likely, pick these up at your local hobby store or on Amazon.
Materials Needed for Wood Slice Ornaments: (Amazon Affiliate Links Included in this list)
- Pre-drilled Wood Slices
- Acrylic Paint (black and white)
- Paint Brush
- Wood Beads
- Jute String
- Ribbon
- Cricut Machine (for decal)
- Black and White Permanent Vinyl (for decal)
- Transfer tape
- Ornament Word Cutfiles (for decal)
- A sealant like Mod Podge or Polycrylic

How to make Wood Slice Ornaments
Alright, now for the fun part! Let me show you have to put these Christmas wood slice ornaments together! On to step one…
1. Paint Wood Slices and Beads
To begin, paint your wood rounds and beads using the black and white acrylic paint. (This may take a couple of coats depending on the quality and thickness of your acrylic paints.)
For the painting the beads, I painted mine by holding them, but you might find it helpful to put the beads on on a pipe cleaner and hold that while you paint around them. (It also might save you a little extra mess.)
Note: For this project, I purchased a pack of wooden beads that had an assortment of sizes. For these wood slice ornaments, I used the 16mm, 14mm, and 12mm sized ones.

2. Prepare Your Decals
To prep your decals: First, download the digital ornament svgs. Second, in Design Space (Cricut), size them to fit the rounds. Thirdly, cut the decals using the Cricut. Fourth, weed the excess vinyl from each design. Lastly, using transfer tape, transfer your design to the wood slice.
I know that sounds like a ton of steps in one, but I’m assuming you know how to use your cutting machine.
If you need a little extra help, here’s a tutorial on how to upload an SVG file into Cricut Design Space.) Another tutorial on how to open and cut an SVG file in Cricut Design Space. And lastly, one more tutorial on how to weed a vinyl decal.

3. Seal Your Decals
Once your decal is placed right where you want it on your wood slice ornament, it’s time to seal that decal in place. To seal your decal, put a layer of Mod Podge or Polycrylic over the decal, then let it dry. (I used a foam brush to do this step.)
4. String Your Ornament
Once your sealant has dried, you can put your string hanger in place. To string the jute, fold the string in half and put the loop through the back hole. Then take the other two pieces and put them through the front loop and pull tight.

5. Add the Beads
Next, string the beads with both of the jute ends, then tie a knot right above them to keep them secure. Lastly, tie off the ends to create a loop to hang the ornament from.
6. Tie the Ribbon
Lastly, take your ribbon and tie a cute, little bow under the beads.

AND…Voila!
How Kids can Help Make the Wood Slice Ornaments
My kids love crafting me with. I’m always looking for little jobs they can do so they feel a part of the process. Depending on the age and skill of your kids here are a few jobs they can do:
- Paint the rounds and beads (since acrylic paint can stain and is toxic if consumed–leave this for the big kids)
- Weed the decals (removing the excess vinyl)
- Placing the decal on the wood slice
- Stringing the ornament and beads
- Tying the ribbon

Wood Slice Ornaments – Q & A
1. What is the best paint for wood slice ornaments?
Acrylic is really the best paint to use on wood slice ornaments.
2. Why are my wood slice ornaments cracking?
If your wood slices are cracking they probably weren’t dried correctly. Then when you go to paint them, it dries the wood out more causing more drying and more cracking.
3. What happens if you do not seal your vinyl decal to the wood slice ornament?
If you don’t seal the decal to the wood slice, it will peel or fall off over time.
4. Where can I get Christmas SVG files?
You can get Christmas SVG files all over the internet! Etsy is a great place to start!


Love this! Thanks for sharing!
sure!
I love this…..these would make great gifts for my students and others
Awesome! These would make great gifts!
i have fallen in love with so many of your ideas and crafts. I am so not great on the computer so i’m having a bit of a problem trying to print out the holiday images for the chalkboard tree ornaments. Either it comes out super small or too big? I don’t know how to edit the size?…Please help me as i’m trying to make these today. Thank you
You can upload the png file to a creative program like keynote, canvas, etc. and adjust the size in there.I hope this helps!
Can you do this without painting the ornament first but placing the vinyl directly on the wood?
Sure! I don’t see why not as long as the surface is smooth and clean.
Love these! One question…Why do you have to deal them if it’s permanent vinyl?
Great question. If they look secure to you, you can skip this step. But for me, between having kids and storing them for years to come, I decided I wanted an extra layer of protection. 🙂
We have several down small trees on our land. This a great idea to use them for.
Yes! That would be a great way to use them! Happy crafting!
Depending on the size of your cookie cutters. I think we got about 6-8 out of one batch.
We make an ornament out of the slice that we take off the bottom of the tree each year to make a fresh cut so it absorbs water better.
Thats a great idea!
What a wonderful idea, I had never thought of that. I saw your beautiful picture, but I had no idea how it was done. thank you for making such a detailed post.